We're excited to bring lightning-fast fiber internet to your home. To make things easier for you, we've introduced a self-scheduling option for your installation appointment.
Enter your address then click the Check availability button.
If your address is serviceable, you’ll head straight to building your order. If not, no worries—you’ll get the chance to join the Ting Waitlist and be the first to know when we’re in your neighborhood.
If you wish to rent Ting’s router, select “Whole Home WiFi” and specify the number of mesh router units you desire. If you will use your own router, select “Use my own device.”
Step 3: Enter Property Information
In order for Ting to install fiber internet on the property, we need to confirm a few things:
Residency Ownership: If own this property, you're all set to move forward. If you are renting, you will be asked to provide your landlord's contact information in order for fiber to be installed. Installation appointments will not proceed without permission of the home owner to perform minor construction on their property.
Utilities: To ensure minimal disruption, you will be asked to select any and all utilities on the property. Marking your private utilities will help us avoid hitting any private utilities lines when installing fiber. To learn more about the construction process, check out our Ting Fiber Internet Construction Overview help article.
Access Agreement: This provides Ting with permission to access your property in order to connect the fiber network.
Screenshot of the Property details screen where users are asked to identify any utilities on their property.
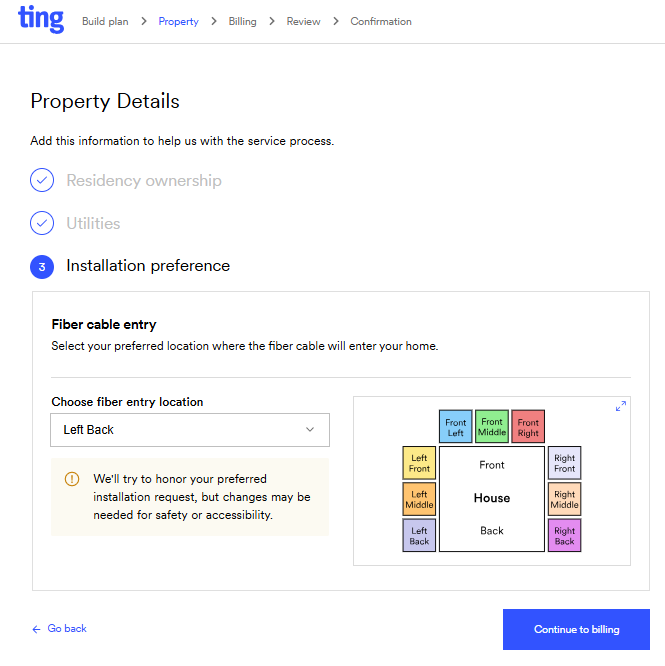
Step 4: Installation preference
As part of your installation, a technician will run a fiber line from the main line to your home. They'll also place a small box (called a network interface device) on the outside of your house. At your home installation appointment, they'll connect a second line from that box to bring fiber into your home. This is your chance to decide where that outside box, and the fiber entry point, should go. Let us know where you'd prefer the fiber to enter your home so we can make it as convenient as possible. We’ll try to honor your preferred installation request, but changes may be needed for safety and/or accessibility.
Step 5: Enter your Billing Information and Review Your Order
On the next screen, you will be asked to enter your billing information. Be sure to enter any promo codes before you checkout!
Review all of your information and selections before you click the Place order and schedule installation button.
Step 6: Choose Your Perfect Time
Now for the fun part! You’ll see a calendar with all the available time slots. Just pick the date and time that works best for you. Each appointment runs 90 minutes.
Reminders:
An adult must be present at the installation appointment.
The safety of our customers and technicians is our top priority. If you have any pets on the premises, either inside or outside, please ensure they are safely secured away from the work site and our technicians during the installation appointment and any outdoor construction. This is for the safety and protection of your pets and our technicians.
Screenshot of the Order Placed screen with options to schedule the installation appointment. Click the arrow to navigate between weeks available for installation appointments.
Screenshot of the Order Placed screen showing option to select a specific day and time to schedule an installation appointment.
Step 7: Confirm Your Appointment
After selecting your preferred time, you'll see a summary of your appointment. If everything looks good, go ahead and confirm it. You'll receive a confirmation email with all the details.
Screenshot of Confirmation page.
How to Self-Schedule with an Existing Account
Step 1: Log into Your Ting Account or Sign up for Ting Internet
First things first, head over to your Ting account. If you haven't set one up yet, don't worry! You'll create one when you sign up for our service, just follow the steps in the section above.
Step 2: Navigate to the Plan overview Page
Once you're logged in, look for the Plan overview page. This is your go-to spot for managing your Ting services.
Step 3: Find the Self-Scheduling Tool
On the Overview page, you'll see an option to schedule your installation. It's easy to spot - we've made sure it stands out!
Step 4: Choose Your Perfect Time
Now for the fun part! You’ll see a calendar with all the available time slots. Just pick the date and time that works best for you. Each appointment runs 90 minutes.
Screenshot of the "Order placed! Schedule your installation" pop up window where you can select an installation time.
Step 5: Confirm Your Appointment
After selecting your preferred time, you'll see a summary of your appointment.
Reminders:
An adult must be present for the entirety of the installation appointment.
The safety of our customers and technicians is our top priority. If you have any pets on the premises, either inside or outside, please ensure they are safely secured away from the work site and our technicians during the installation appointment and any outdoor construction. This is for the safety and protection of your pets and our technicians.
If everything looks good, go ahead and confirm it by pressing the Submit button. You'll receive a confirmation email with all the details.
Screenshot of the "Order placed! Schedule your installation pop up window! Where you are asked to select who will be present at the installation and select the Submit button to confirm.
How to Reschedule our appointment
Life happens, we get it! If you need to change your appointment, you can do so in your account.
Step 1: Log into your Ting Internet Account
First things first, head over to your Ting account. , you will be brought to the Plan overview page for your account.
Step 2: Select Reschedule
Your installation appointment information will be shown as a banner at the top of the Plan overview page. Select the Reschedule button to reschedule your appointment.
Screenshot of the Plan overview screen where you can see your installation appointment information and either reschedule or cancel your appointment.
Step 3: Choose your Preferred Day/Time
Pick a date and time that works best for you. Each appointment runs 90 minutes.
Screenshot of the "Order placed! Schedule your installation" pop up window where you can select an installation day/time.
Step 4: Confirm Your Rescheduled Appointment
After selecting your preferred time, you'll see a summary of your appointment.
Reminders:
An adult must be present for the entirety of the installation appointment.
The safety of our customers and technicians is our top priority. If you have any pets on the premises, either inside or outside, please ensure they are safely secured away from the work site and our technicians during the installation appointment and any outdoor construction. This is for the safety and protection of your pets and our technicians.
If everything looks good, go ahead and confirm it by pressing the Submit button. You'll receive a confirmation email with all the details.
Screenshot of the "Order placed! Schedule your installation pop up window! Where you are asked to select who will be present at the installation and select the Submit button to confirm.
Canceling your appointment
If you are unsure about when you will be able to reschedule your installation appointment and you wish to cancel your Ting Internet order, follow the steps below:
Step 1: Log into your Ting Internet Account
First things first, head over to your Ting account , you will be brought to the Plan overview page for your account.
Step 2: Select Cancel Installation
Your installation appointment information will be shown as a banner at the top of the Plan overview page. Select the Cancel Installation button to cancel your order and installation appointment.
Screenshot of the Plan overview screen where you can see your installation appointment information and either reschedule or cancel your appointment.
Step 3: Select Proceed
A pop-up confirmation will appear on your screen. To proceed with canceling your appointment, click Proceed.
Note: Clicking Cancel will keep your appointment and cancel the cancellation process.
Screenshot of the popup asking for you to confirm canceling your appointment.
Step 4: Confirmation Notification
Your account should now have two banners:
A temporary banner saying that your appointment has been queued for cancellation.
A banner under your address requesting that you schedule an installation appointment.
Screenshot of Account Overview page with banners.
What to Expect on Installation Day
On the big day, our skilled technician will arrive during your chosen time window. They'll set up your fiber connection and make sure everything is running smoothly before they leave. See our Getting Ting Fiber to your Home help article for more details about the installation process.
Questions?
If you have any questions about self-scheduling or your upcoming installation, don't hesitate to reach out to our Customer Care team. We're always here to help!
We can't wait to get you connected to Ting's super-fast fiber internet.


.png)